
10 Common Framing Mistakes That Fail Inspections in Toronto and the GTA
Nobody schedules a failed inspection on purpose. But it happens more than it should — and usually not because a crew doesn't know what they're doing. It happens because a project moves fast, a detail gets missed, and the inspector arrives before anyone noticed.
A failed framing inspection in Toronto or the GTA means a re-inspection fee, a delay to every trade waiting behind you, and a rework job that's almost always more annoying than it would have been to do right the first time. We've been on enough job sites to know which mistakes come up repeatedly and we've put this list together for anyone who wants to arrive at their framing inspection with confidence.
Some of these are structural. Some are what people call "minor details." All of them will stop an inspection in its tracks.
Before We Get to the List
This one isn't in the Ontario Building Code. Your inspector isn't going to cite you for a cluttered floor. But we'd be doing you a disservice if we didn't mention it — because it matters more than people think.
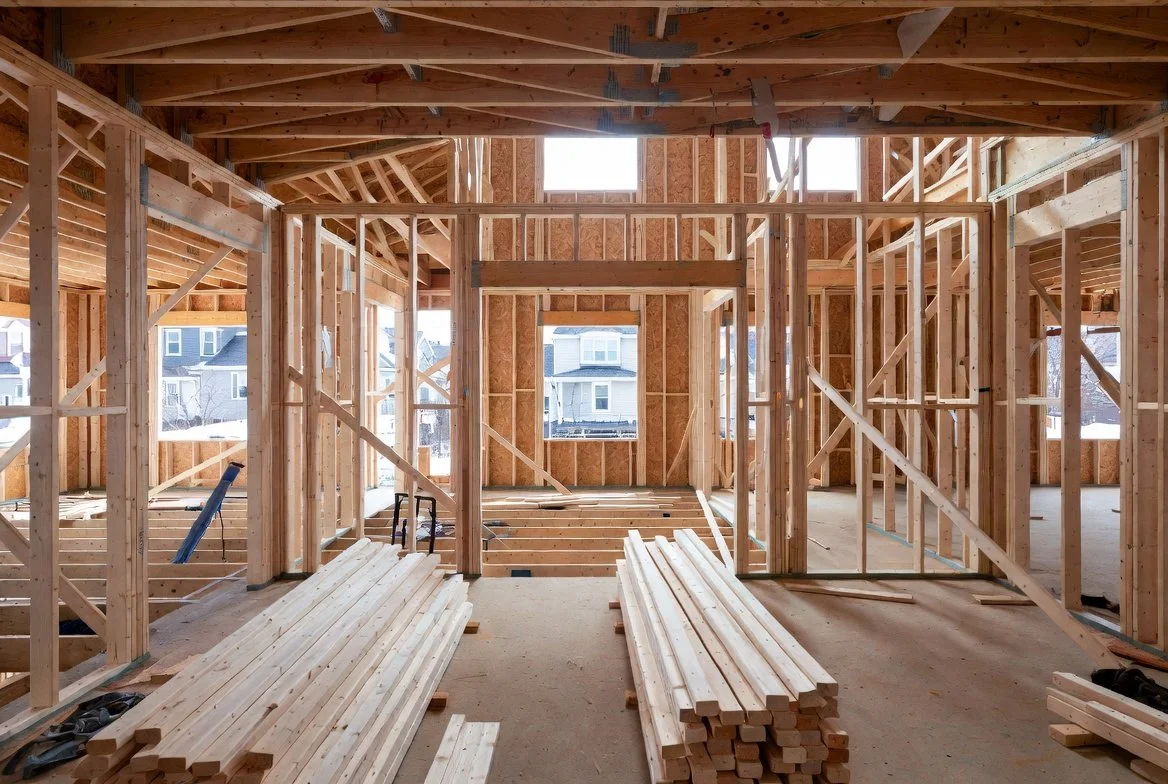
A messy job site tells an inspector something before they've looked at a single structural detail. It tells them this crew rushes. It tells them things get missed. And inspectors are human: when the site looks like a lumber yard exploded inside a skip bin, they slow down. They look harder. They find more.
A clean site does the opposite. It signals that the crew cares about what they're doing. We've watched inspectors move through clean, organized sites efficiently and cooperatively — and watched the same inspector spend an extra hour on a messy one looking for problems that weren't there.
The job site is the first impression you make on an inspector. Make it a good one.
Before you call for your framing inspection: clear the floors of offcuts and scrap. Stack any remaining lumber. Remove trip hazards. Make sure the approved plans and permit are visible and accessible on site. None of this is structural — but all of it matters.
A tidy site gets an inspector thinking: "these people know what they're doing." That framing carries through everything that follows.
The 10 Most Common Framing Mistakes
These are the issues we see come up repeatedly on framing re-inspections across Toronto and the GTA. All of them are worth checking before you make the call.
1 - Missing or Incomplete Guardrails and Handrails
This one surprises contractors who think guardrails are a finishing trade's problem. They're not. At the framing stage, the OBC requires guards wherever there's an open side of a floor, mezzanine, landing, balcony, or stair that is more than 600mm (roughly 2 feet) above the level below. The framing inspection happens before finishing trades — meaning those guards need to be in place before the inspector arrives, even as temporary construction guards.
Missing guards is one of the most common causes of an immediate stop on a framing inspection. Don't call until they're in.
2 - Missing Bearing Points and Point Load Transfer
Load transfer is the core structural logic of a frame: every load coming down from above needs a clear path to the foundation. Where a beam, post, or concentrated load lands on a wall or floor, there needs to be adequate support beneath it — typically doubled studs, a post, or a beam — carrying that load down to the footing.
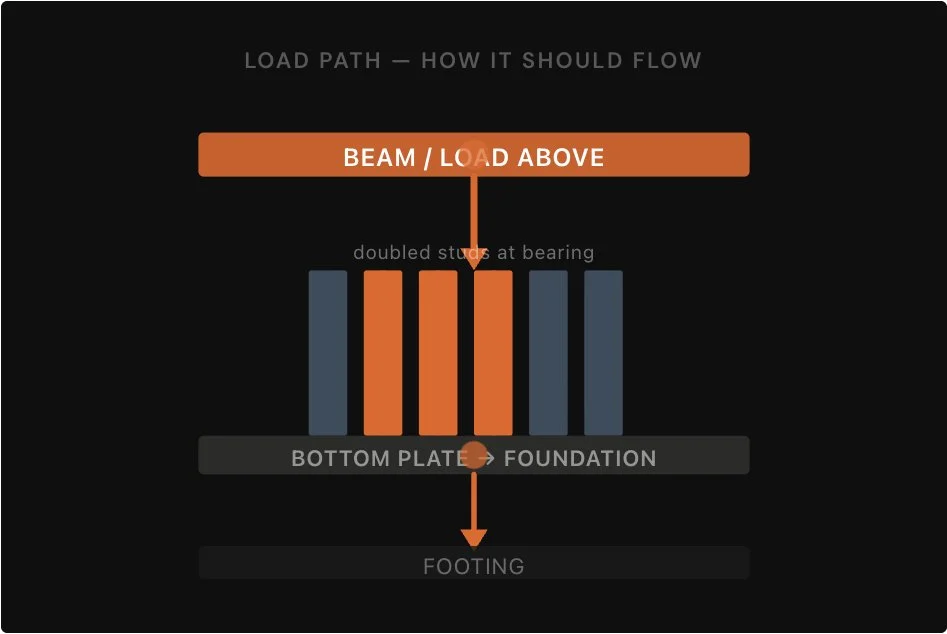
Missing Bearing Points and Point Load Transfer
The mistake: a framing crew installs a beam but the wall below doesn't have the bearing capacity to support it — missing doubled studs, an unsupported post, a gap in the load path. The inspector checks this carefully because it's a genuine structural concern, not a cosmetic one.
3 - Missing Squash Blocks (Point Loads Through Floor Systems)
Squash blocks, solid lumber blocking installed vertically within a floor system directly beneath a point load, are one of the most commonly missed details on residential frames. When a post or concentrated load bears down through a floor system of I-joists or floor trusses, the assembly can't simply absorb that load. The load needs to transfer through the floor to the bearing wall or post below. Squash blocks do that job.
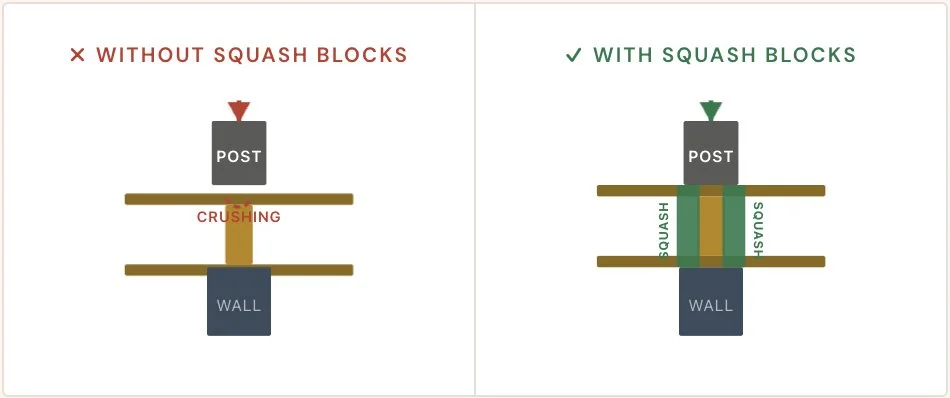
Missing Squash Blocks
Without squash blocks, a point load crushes the top flange of an I-joist over time, deflects the floor, and in the worst case, compromises the structural connection. Inspectors in Toronto know to check for them at every location where a concentrated load lands on a floor assembly. If they're missing, you're not passing.
Where they're typically needed: under posts carrying beams, under
4 - Missing Joist Hangers or Hangers Installed with Missing Nails
Joist hangers look minor and carry enormous consequences. Every hanger has a load rating, and that rating is only valid when the hanger is fully nailed as specified by the manufacturer, typically every hole filled with the correct nail type and size.
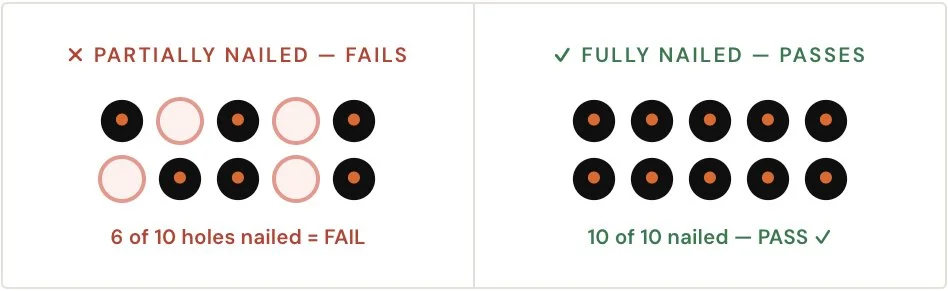
Missing Joist Hangers
5 - Missing or Incomplete Truss Web Bracing and Bottom Chord Bracing
Engineered roof trusses come with shop drawings that include a bracing plan. That plan specifies exactly where lateral bracing is required, top chords, bottom chords, and within the web, to stabilize the trusses during and after installation. It's not advisory. It's a required part of the engineered assembly.
The failure: trusses go up and the bracing gets skipped, partially done, or done in the wrong locations. Inspectors in Toronto will have the truss shop drawings in hand and will check bracing against them, point by point. "The trusses are standing" is not the same as "the trusses are braced to spec."
Truss shop drawings must be on site at the framing inspection. If they're not, the inspector may not be able to verify compliance and can refuse to sign off.
6 - Truss Installation Not Matching the Manufacturer's Layout Plan
Every set of engineered trusses comes with a layout plan showing which truss goes where, numbered, positioned, and oriented. Different trusses in the same delivery may look similar but carry different loads, have different web configurations, or require specific placement relative to openings and bearing points.
When trusses are installed in the wrong sequence or flipped, especially girder trusses, the load distribution changes. Inspectors check the installed trusses against the layout plan. If they don't match, you're not passing until they do.
Follow the layout plan. Keep it on site with the shop drawings. Number trusses on site as they're delivered and install them in sequence.
7 - Improper Notching and Drilling of Structural Members
Plumbers and electricians need to run pipes and wires through framed walls and floors. What's not acceptable is when that work compromises the structural capacity of a stud, joist, or beam.
What happens in practice: a plumber needs a slightly larger hole, the member gets over-drilled, nobody thinks to reinforce it, and the framing inspection catches it. Now two trades are delayed.
Brief your plumber and electrician on the OBC limits before they start. If they need to exceed them, get an engineered solution before the work is done — not after the inspector flags it.
8 - Staircase Framing That Doesn't Match Approved Drawings
Stair framing is one of the most code-dense parts of a residential frame. The OBC sets tight tolerances across every dimension.
200 mm max riser height (OBC)
235 mm min tread depth residential
5mm max riser-to-riser variation
1,950 mm headroom clearance
The common failure: the stair framing doesn't match the approved drawings wrong opening position, the rough height doesn't land the finished stair at the right dimensions, or the headroom is insufficient once the finished floor height is factored in.
Stairs should be coordinated with your drawings before framing, not confirmed after. Work out your finished floor heights, stair calculator, and headroom clearance before the stair opening gets cut.
9 - Fireblocking Missing or Installed Incorrectly
Fireblocking, solid blocking that interrupts concealed cavities that could act as a chimney for fire spread, is required by the OBC at each floor level, at the top of each stud wall, at connections between horizontal and vertical concealed spaces, and around penetrations through certain assemblies.
It gets missed when the framing crew is focused on structure and other trades haven't been coordinated yet. A stud bay with an open pipe penetration through a plate, or a floor system without blocking at the exterior wall line, both will stop a framing inspection.
Walk the site specifically for fireblocking before calling the inspection. It's a separate check from your structural review — locations are easy to overlook when you're focused on hangers and headers.
10 - Work That Doesn't Match the Approved Permit Drawings
An inspector's job is to verify two things: that the work meets the OBC, and that it matches what was approved on your permit drawings. If those drawings show a beam in a specific location and that beam is somewhere else, even if the alternative is structurally sound, it's a discrepancy that needs to be resolved.
Field changes happen on every project. The problem is when they happen without updating the drawings or getting the change approved. An inspector who finds work that doesn't match the permit package may issue a stop-work order until the discrepancy is explained and resolved by a drawing revision or an engineer confirming the change.
If something changed from the approved drawings during construction, flag it before the inspection. A quick call to your designer or engineer to confirm a field change is far cheaper than a failed inspection and a stop-work.
Your Pre-Inspection Checklist
Site is clean, floors clear of debris, scrap stacked or removed, approved plans and permit visible on site
Guardrails installed wherever the drop exceeds 600mm, at correct heights (900mm or 1,070mm, depending on drop)
Stair handrails are in place on any flight with more than two risers
All bearing points confirmed — doubled studs, posts, and beams transfer loads to bearing walls and foundation as per drawings
Squash blocks are installed at every location where a post or concentrated load bears through a floor system
All joist hangers installed — every hole nailed with the correct nail type, no partial nailing
Truss shop drawings and layout plan on site and accessible to the inspector
Truss bracing installed as per shop drawings — top chord, bottom chord, and web bracing confirmed in correct locations
Trusses installed in the correct sequence and orientation per the manufacturer's layout plan
All mechanical penetrations within OBC limits — no oversized holes in structural members; reinforcement plates where required
Stair framing checked against approved drawings — opening size, position, and headroom confirmed
Fireblocking installed at all required locations — floor levels, top plates, pipe and duct penetrations
Any field changes from approved drawings must be documented and resolved with the designer or engineer before inspection
All required prior inspections are complete and signed off
How We Approach Inspections on Our Projects
We don't treat the framing inspection as the finish line. We treat it as the confirmation that what we built is what we said we'd build, which means the inspection itself should be uneventful.
The details on this list, such as squash blocks, bearing points, hanger nailing, and truss bracing, aren't inspection surprises for us. They're part of how we frame. We run a self-check before any inspection, make sure the site is presentable, and make sure the drawings are on site so the inspector has what they need to move quickly.
What a failed framing inspection costs isn't just the re-inspection fee. It's the downstream delay to every trade booked behind the framing sign-off. None of that is worth a few skipped nails in a hanger.
If you want to understand more about what goes into a solid residential frame, our load-bearing walls guide and bearing points post go deeper on the structural details that underlie most of these inspection items.
Related Reading
Framing a home in Toronto or the GTA and want to get the inspection right?
We're happy to walk through what the inspection process looks like for your specific project, what the inspector will be looking at, which details are commonly missed in your municipality, and how we sequence the work to make the inspection clean.
Call us at (647) 641-0550 or get in touch online. No sales pitch — just a straight conversation with people who've been through a lot of framing inspections.